<
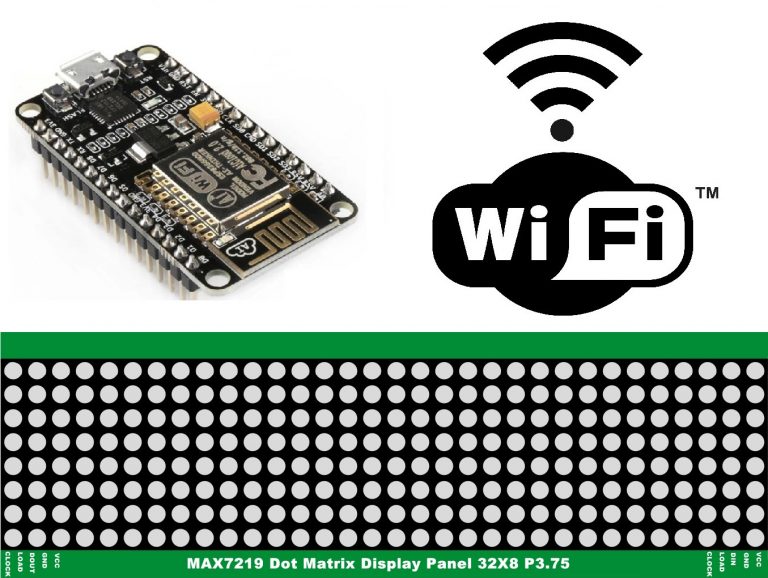
এবার নিম্নরূপ ভাবে কানেকশন সম্পন্ন করতে হবে।
| ESP8266 NodeMCU | MAX7219 Dot Matrix Display |
| D3 | LOAD |
| D5 | CLOCK |
| D7 | DIN |
| GND | GND |
| Power Distribution Board | MAX7219 Dot Matrix Display |
| + 5V | VCC |
| ESP8266 NodeMCU | Power Distribution Board |
| Vin | Vin (Blue Connector) |
| GND | GND |
কোডঃ
কানেকশন সম্পূর্ণ হলে পরের ধাপে আমরা প্রোগ্রামিং করবো। নিচের কোডটি Arduino IDE দিয়ে NodeMCU এর ভিতর আপলোড দিতে হবে।
১। এই জন্য নিচের দেওয়া কোড টি Arduino IDE তে লিখতে হবে।
#include <ESP8266WiFi.h>
#include <ESP8266WebServer.h>
#include <SPI.h>
#include <Adafruit_GFX.h>
#include <Max72xxPanel.h>

#define SSID "Wifi Name"
#define PASS "Wifi Password"

// insert your password
// ******************* String form to sent to the client-browser ************************************
String form =
  "<p>"
  "<center>"
  "<h1>WiFi Control MAX7219 DISPLAY Panel with ESP8266</h1>"
  "<form action='msg'><p>Message <input type='text' name='msg' size=80 autofocus> <input type='submit' value='Submit'></form>"
  "</center>";

ESP8266WebServer server(80);                             // HTTP server will listen at port 80
long period;
int offset=1,refresh=0;
int pinCS = 0; // Attach CS to this pin, DIN to MOSI and CLK to SCK (cf http://arduino.cc/en/Reference/SPI )
int numberOfHorizontalDisplays = 8;
int numberOfVerticalDisplays = 1;
String decodedMsg;
Max72xxPanel matrix = Max72xxPanel(pinCS, numberOfHorizontalDisplays, numberOfVerticalDisplays);

String tape = "Arduino";
int wait = 40; // In milliseconds

int spacer = 2;
int width = 5 + spacer; // The font width is 5 pixels

/*
  handles the messages coming from the webbrowser, restores a few special characters and
  constructs the strings that can be sent to the oled display
*/
void handle_msg() {

  matrix.fillScreen(LOW);
  server.send(200, "text/html", form);    // Send same page so they can send another msg
  refresh=1;
  // Display msg on Oled
  String msg = server.arg("msg");
  Serial.println(msg);
  decodedMsg = msg;
  // Restore special characters that are misformed to %char by the client browser
  decodedMsg.replace("+", " ");
  decodedMsg.replace("%21", "!");
  decodedMsg.replace("%22", "");
  decodedMsg.replace("%23", "#");
  decodedMsg.replace("%24", "$");
  decodedMsg.replace("%25", "%");
  decodedMsg.replace("%26", "&");
  decodedMsg.replace("%27", "'");
  decodedMsg.replace("%28", "(");
  decodedMsg.replace("%29", ")");
  decodedMsg.replace("%2A", "*");
  decodedMsg.replace("%2B", "+");
  decodedMsg.replace("%2C", ",");
  decodedMsg.replace("%2F", "/");
  decodedMsg.replace("%3A", ":");
  decodedMsg.replace("%3B", ";");
  decodedMsg.replace("%3C", "<");
  decodedMsg.replace("%3D", "=");
  decodedMsg.replace("%3E", ">");
  decodedMsg.replace("%3F", "?");
  decodedMsg.replace("%40", "@");
  //Serial.println(decodedMsg);                   // print original string to monitor


  //Serial.println(' ');                          // new line in monitor
}

void setup(void) {
matrix.setIntensity(15); // Use a value between 0 and 15 for brightness

// Adjust to your own needs
//  matrix.setPosition(0, 1, 0); // The first display is at <0, 0>
//  matrix.setPosition(1, 0, 0); // The second display is at <1, 0>

// Adjust to your own needs
  matrix.setPosition(0, 7, 0); // The first display is at <0, 7>
  matrix.setPosition(1, 6, 0); // The second display is at <1, 0>
  matrix.setPosition(2, 5, 0); // The third display is at <2, 0>
  matrix.setPosition(3, 4, 0); // And the last display is at <3, 0>
  matrix.setPosition(4, 3, 0); // The first display is at <0, 0>
  matrix.setPosition(5, 2, 0); // The second display is at <1, 0>
  matrix.setPosition(6, 1, 0); // The third display is at <2, 0>
  matrix.setPosition(7, 0, 0); // And the last display is at <3, 0>

//ESP.wdtDisable();                               // used to debug, disable wachdog timer,
  Serial.begin(115200);                           // full speed to monitor

  WiFi.begin(SSID, PASS);                         // Connect to WiFi network
  while (WiFi.status() != WL_CONNECTED) {         // Wait for connection
    delay(500);
    Serial.print(".");
  }
  // Set up the endpoints for HTTP server,  Endpoints can be written as inline functions:
  server.on("/", []() {
    server.send(200, "text/html", form);
  });
  server.on("/msg", handle_msg);                  // And as regular external functions:
  server.begin();                                 // Start the server


  Serial.print("SSID : ");                        // prints SSID in monitor
  Serial.println(SSID);                           // to monitor

  char result[16];
  sprintf(result, "%3d.%3d.%1d.%3d", WiFi.localIP()[0], WiFi.localIP()[1], WiFi.localIP()[2], WiFi.localIP()[3]);
  Serial.println();
  Serial.println(result);
  decodedMsg = result;
  Serial.println("WebServer ready!   ");

  Serial.println(WiFi.localIP());                 // Serial monitor prints localIP
  Serial.print(analogRead(A0));

}


void loop(void) {

  for ( int i = 0 ; i < width * decodedMsg.length() + matrix.width() - 1 - spacer; i++ ) {
    server.handleClient();                        // checks for incoming messages
    if (refresh==1) i=0;
    refresh=0;
    matrix.fillScreen(LOW);

    int letter = i / width;
    int x = (matrix.width() - 1) - i % width;
    int y = (matrix.height() - 8) / 2; // center the text vertically

    while ( x + width - spacer >= 0 && letter >= 0 ) {
      if ( letter < decodedMsg.length() ) {
        matrix.drawChar(x, y, decodedMsg[letter], HIGH, LOW, 1);
      }

      letter--;
      x -= width;
    }

    matrix.write(); // Send bitmap to display

    delay(wait);
  }
}
লাইব্রেরীঃ
Adafruit_GFX ও Max72xxPanel এই দুটি লাইব্রেরী ফাইল Arduino লাইব্রেরীতে Add করতে হবে।
৩। পূর্বে থেকে যদি কেউ NodeMCU নিয়ে কাজ না করে থাকেন তাহলে এই ESP8266 ESP-01 কে Arduino IDE দিয়ে প্রোগ্রাম করার নির্দেশনা টিউটোরিয়াল দেখতে পারেন। এখানে খুব সুন্দর ভাবে সব কিছু দেওয়া আছে।
৪। এবার কোডটি কম্পাইল করতে হবে। তবে কিছু সিলেকশন আছে, যা নিচের নিয়মে করতে হবে।
৫। অতপর আপলোড বাটনে ক্লিক করতে হবে। যখন প্রোগ্রাম আপলোড হবে তখন নিচের মত করে ডট বার দেখাবে এতে বুঝতে হবে প্রোগ্রামিং হচ্ছে। প্রোগ্রাম হয়ে গেলে 100% দেখাবে।
প্রোগ্রাম আপলোড শেষ হলে ডিসপ্লেতে একটি IP Address দেখাবে। এই IP Address টি আপনার মোবাইলের ব্রাউজারে লিখলেই নিচের মত একটি পেজ দেখাবে। এবার আপনি কিছু লিখে সাবমিট বাটনে ক্লিক করলেই ডিসপ্লেতে দেখানো শুরু করবে।
একটি বিষয় লক্ষ রাখতে হবে, আপনার মোবাইল কিংবা কম্পিউটার যেন একই রাউটারে কানেক্টেড থাকে। যে রাউটারে ডিসপ্লেটি কানেক্টেড।
আউটপুটঃ
]]>
Nice. আমি Wifi Display বানাই MAX7219 Dot Matrix Panel দিয়ে শিখতে চাই। কি ভাবে যোগাযোগ করব? প্লিজ জানাবেন।
বাংলা ডিসপ্লে চাই
Serial Monitor thaka IP address passe na ESP8266MOD reset korar por o.
Need solution.
Please check your router power. SSID & Password.
বিদুৎ না থাকলে কিভাবে খুলব? লক কি ভাবে দরজা বা অন্য কিছুর সাথে লাগানো র একটা ভিডিও দিলে ভালো হতো ।
Wifi Display বানাই MAX7219 Dot Matrix এর সাথে লক বা দরজার কোন সম্পর্ক নেই।