এই এক্সপেরিমেন্টে আমরা আরডুইনোভিত্তিক একটি এসি অ্যামিটার তৈরী করব। এসি অ্যামিটার তৈরী করতে ব্যবহার করা হবে একটি Grove-electricity sensor।এটি মূলত একটি স্টেপ ডাউন কারেন্ট ট্রান্সফর্মার। এই ট্রান্সফর্মারের টার্ন রেশিও ২০০০ঃ১। এর রেজিস্টেন্স ৮০০ ওহম। আমাদের তৈরী অ্যামিটারটি দিয়ে সর্বোচ্চ ৫ অ্যাম্পিয়ার পর্যন্ত এসি কারেন্ট পরিমাপ করা যাবে।
/wp:paragraph wp:table| প্রয়োজনীয় যন্ত্রপাতি | পরিমাণ | প্রোডাক্ট লিংক |
| Arduino UNO R3 | 1 | এখানে ক্লিক করুন |
| Grove-electricity sensor | 1 | এখানে ক্লিক করুন |
| LCD module | 1 | এখানে ক্লিক করুন |
| 9V battery | 1 | এখানে ক্লিক করুন |
| 9V battery connector with power jack | 1 | এখানে ক্লিক করুন |
| Power cable 2 pin | 1 | এখানে ক্লিক করুন |
| Male to female jumper | 9 | এখানে ক্লিক করুন |
| Male to male jumper | 2 | এখানে ক্লিক করুন |
| Bulb with holder | 1 | |
| Electric cable | 2 |
/wp:paragraph wp:paragraph
প্রোগ্রামঃ
/wp:paragraph wp:code#include <LiquidCrystal.h>
#define ELECTRICITY_SENSOR A0 // Analog input pin that sensor is attached to
// initialize the library by associating any needed LCD interface pin
// with the arduino pin number it is connected to
const int rs = 12, en = 11, d4 = 5, d5 = 4, d6 = 3, d7 = 2;
LiquidCrystal lcd(rs, en, d4, d5, d6, d7);
float amplitude_current; //amplitude current
float effective_value; //effective current
void setup()
{
lcd.begin(16, 2);
Serial.begin(9600);
pins_init();
}
void loop()
{
int sensor_max;
sensor_max = getMaxValue();
Serial.print("sensor_max = ");
Serial.println(sensor_max);
//the VCC on the Grove interface of the sensor is 5v
amplitude_current=(float)sensor_max/1024*5/800*2000000;
effective_value=amplitude_current/1.414;//minimum_current=1/1024*5/800*2000000/1.414=8.6(mA)
//Only for sinusoidal alternating current
Serial.println("The amplitude of the current is(in mA)");
Serial.println(amplitude_current,1);//Only one number after the decimal point
lcd.setCursor(0,0);
lcd.print("Peak=");
lcd.print(amplitude_current);
lcd.print("mA ");
lcd.setCursor(0,1);
lcd.print("RMS=");
lcd.print(effective_value);
lcd.print("mA ");
Serial.println("The effective value of the current is(in mA)");
Serial.println(effective_value,1);
}
void pins_init()
{
pinMode(ELECTRICITY_SENSOR, INPUT);
}
/*Function: Sample for 1000ms and get the maximum value from the SIG pin*/
int getMaxValue()
{
int sensorValue; //value read from the sensor
int sensorMax = 0;
uint32_t start_time = millis();
while((millis()-start_time) < 1000)//sample for 1000ms
{
sensorValue = analogRead(ELECTRICITY_SENSOR);
if (sensorValue > sensorMax)
{
/*record the maximum sensor value*/
sensorMax = sensorValue;
}
}
return sensorMax;
}সার্কিট কানেকশনঃ
/wp:paragraph wp:paragraphইলেক্ট্রিসিটি সেন্সর এবং আরডুইনোর মধ্যে নিচের কানেকশনটি সম্পন্ন করুন।
/wp:paragraph wp:image {“id”:74233,”sizeSlug”:”large”}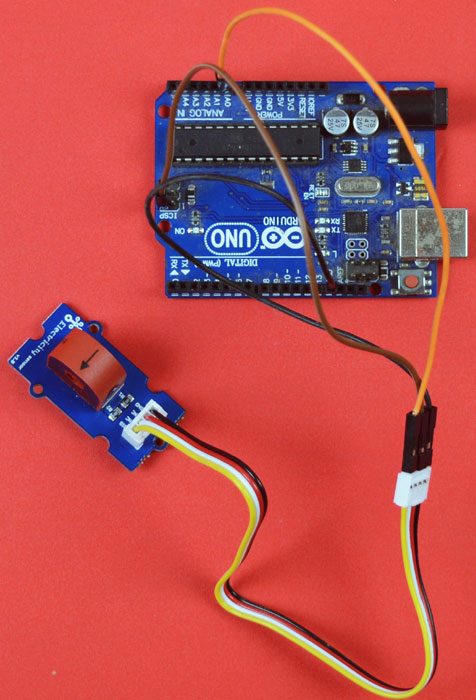
| Arduino UNO R3 | Grove electricity sensor |
| VCC/AREF | RED |
| GND | Black |
| A0 | Yellow |
এলসিডি মডিউল এবং আরডুইনোর মধ্যে নিচের কানেকশনটি সম্পন্ন করুন।
/wp:paragraph wp:image {“id”:74231,”sizeSlug”:”large”}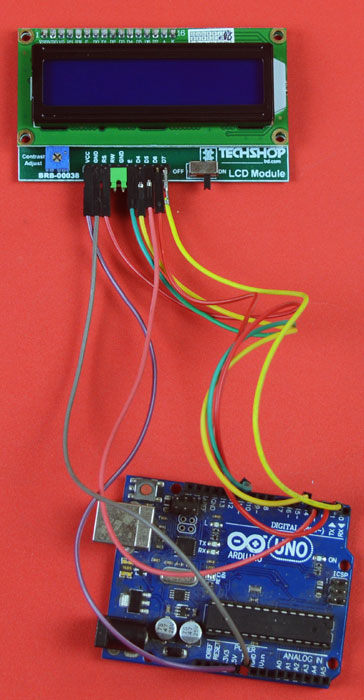
| LCD module | Arduino UNO R3 |
| VCC | 5V |
| GND | GND |
| RS | 12 |
| RW | GND |
| E | 11 |
| D4 | 5 |
| D5 | 4 |
| D6 | 3 |
| D7 | 2 |
এবার নিচের ছবি অনুযায়ী বাল্ব হোল্ডারের সাথে সল্ডার করা একটি তারকে কারেন্ট সেন্সরের মধ্যে প্রবেশ করান। এবার বাল্বের দুই তারের সাথে এসি কেবলের দুই তার যুক্ত করুন। AC প্লাগটিকে সকেটে প্রবেশ করান।
/wp:paragraph wp:image {“id”:74229,”sizeSlug”:”large”}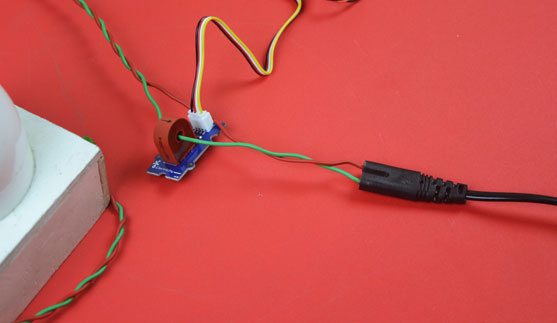
বাল্ব জ্বলে উঠবে এবং এলসিডিতে বাল্বের ভেতর দিয়ে প্রবাহিত কারেণ্টের পরিমাণ দেখা যাবে।
/wp:paragraph wp:image {“id”:74228,”sizeSlug”:”large”}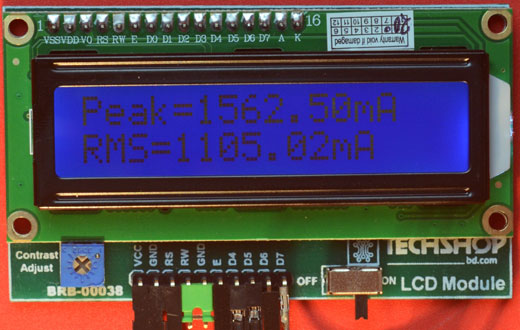
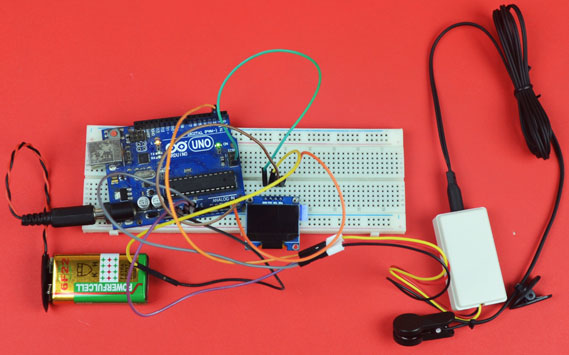
আমাদের পুরো সেট আপটি দেখতে ছিল এরকম।
/wp:paragraph wp:image {“id”:74234,”sizeSlug”:”large”}