আউটপুটের ধরনের উপর নির্ভর করে সুইচকে দুই ভাগে ভাগ করা যায়। এই দুই ধরনের সুইচ নিয়েই আজকে আলোচনা করা হবে।
১)মোমেন্টারি সুইচ ২)টোগোল সুইচ।
সংজ্ঞায় না গিয়ে প্রথমে এক্সপেরিমেন্টগুলো দেখা যাক।
| প্রয়োজনীয় যন্ত্রপাতি | পরিমান | লিংক |
| Arduino UNO-R3(China) | 1 | এখানে ক্লিক করুন |
| Push switch-4 pin(small) | 1 | এখানে ক্লিক করুন |
| 10K ohm ¼ w resistor | 1 | এখানে ক্লিক করুন |
| Mini breadboard (3*2 inch) | 1 | এখানে ক্লিক করুন |
| Male to male jumpers | 6 | এখানে ক্লিক করুন |
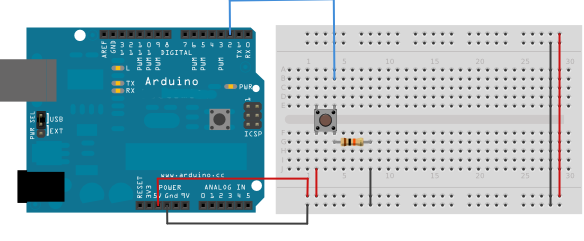
সার্কিটঃ নিচের সার্কিটটি সম্পন্ন করুন।
কোড ১ঃ
const int buttonPin = 2;     // the number of the pushbutton pin
const int ledPin =  13;      // the number of the LED pin

// variables will change:
int buttonState = 0;         // variable for reading the pushbutton status

void setup() {
  // initialize the LED pin as an output:
  pinMode(ledPin, OUTPUT);
  // initialize the pushbutton pin as an input:
  pinMode(buttonPin, INPUT);
}

void loop() {
  // read the state of the pushbutton value:
  buttonState = digitalRead(buttonPin);

  // check if the pushbutton is pressed. If it is, the buttonState is HIGH:
  if (buttonState == HIGH) {
    // turn LED on:
    digitalWrite(ledPin, HIGH);
  } else {
    // turn LED off:
    digitalWrite(ledPin, LOW);
  }
}
লক্ষ্য করুনঃ সুইচ যতক্ষন চেপে ধরে থাকবেন ততক্ষনই এলইডি জ্বলবে। যখন সুইচ ছেড়ে দেবেন তখন নিভে যাবে। জ্বি, এটাকেই বলা হয় মোমেন্টারি আউটপুট।অর্থ্যাৎ, এক্ষেত্রে সুইচ যতক্ষন চেপে ধরে রাখা হবে আউটপুট ততক্ষনই থাকবে। আর যদি, সুইচ একবার প্রেস করার পর এলইডি জ্বলে উঠতো এবং সুইচ ছেড়ে দেবার পরও জ্বলেই থাকতো, তারপর আবার পুশ করার পর এলইডি নিভে যেত এবং নিভেই থাকতো তারপর আবার পুশ করলে আবার জ্বলত তাহলে সুইচটিকে বলা হত টোগোল সুইচ। অর্থ্যাৎ, প্রতিবার সুইচ প্রেস করলে সুইচের টোগোল সুইচের আউটপুট হবে আগের আউটপুটের বিপরীত। এলইডি জ্বলে থাকলে নিভে যাবে, নিভে থাকলে জ্বলে উঠবে। গঠনগতভাবে পুশ সুইচগুলো সবই মোমেন্টারি। তবে প্রোগ্রামে কিছু পরিবর্তনের মাধ্যমে এই একই সুইচকেই মোমেন্টারি থেকে টোগোলে পরিণত করা যাবে। নিচের প্রোগ্রামে আমরা সেই কাজটিই করব।
কোড ২ঃ
const int buttonPin = 2;     // the number of the pushbutton pin
const int ledPin =  0;      // the number of the LED pin
int flag=0;

// variables will change:
int buttonState = 0;         // variable for reading the pushbutton status


void setup() {
  // initialize the LED pin as an output:
  pinMode(ledPin, OUTPUT);
  // initialize the pushbutton pin as an input:
  pinMode(buttonPin, INPUT);
}

void loop() {
  // read the state of the pushbutton value:
  buttonState = digitalRead(buttonPin);

  // check if the pushbutton is pressed. If it is, the buttonState is HIGH:
  if (buttonState == HIGH) {
    // turn LED on:
    if(flag==0)
    {
     delay(100);
    digitalWrite(ledPin, HIGH);

    flag=1;

    }
  else if(flag==1) {
    delay(100);
    digitalWrite(ledPin, LOW);
    flag=0;

  }

}
}