প্রথম পর্বে এফটিডিআই ড্রাইভার ইন্সটলেশনের পর এবার এক্সপেরিমেন্ট শুরুর পালা। এই পর্বে আমরা একটি খুব সহজ উদাহরন দিয়ে দেখব কিভাবে ইউএসবি টু সিরিয়াল কনভার্টার ব্যাবহার করে কম্পিউটারের সাথে মাইক্রোকন্ট্রোলারের ডেটা আদান-প্রদান করানো যায়। এই উদাহরনে মাইক্রোকন্ট্রোলারের সাথে একটি সুইচ লাগানো থাকবে। সুইচটা একেকবার প্রেস করার সাথে সাথে একেকটি লাইন কম্পিউটারের সিরিয়াল মনিটরে প্রিন্ট হবে। কাজটি করতে আমাদের যেসকল যন্ত্রপাতি প্রয়োজন সেগুলো হচ্ছে-
| প্রয়োজনীয় যন্ত্রপাতি | পরিমান | প্রোডক্ট লিংক |
| ATmega16A | 1 | এখানে ক্লিক করুন |
| AVR Programmer | 1 | এখানে ক্লিক করুন |
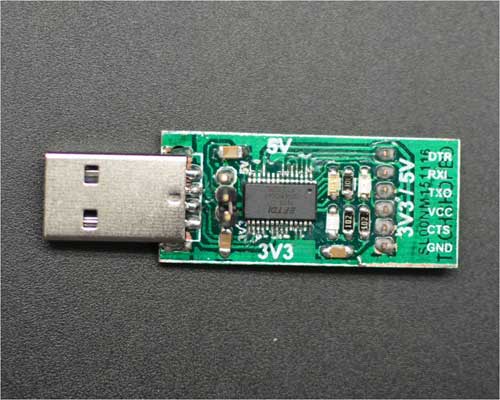
| FTDI USB to Serial Converter 3V3-5V | 1 | এখানে ক্লিক করুন |
| Breadboard | 1 | এখানে ক্লিক করুন |
| Push switch | 1 | এখানে ক্লিক করুন |
| Male to male jumper | 1 | এখানে ক্লিক করুন |
void main()
{
  int x = 0;                                                                    // Declare an Integer
  DDB0_bit = 0;                                                                 // Declare Pin B0 as input
  PORTB0_bit=1;                                                                 // Pull up Pin B0
  UART1_Init(9600);                                                             // Initialize UART module at 9600 bps
  Delay_ms(100);                                                                // Wait for UART module to stabilize

  while (1)                                                                     // Endless loop
  {
    if(PINB0_bit == 0)                                                          // If the button is pressed
    {
     delay_ms(400);                                                             // wait for 400 Mili second
      x++;                                                                      // Increase the value of x
     if(x==1)                                                                   // If button is pressed once
     {
     UART1_Write_Text("I'm Starting with the man in the mirror\r\n");           // Send the line via UART
     }
     else if(x==2)                                                              // If the button is pressed twice
     {
      UART1_Write_Text("I'm asking him to change his ways\r\n");                // Send the line via UART
     }
     else if(x==3)                                                              // If the button is pressed Thrice
     {
      UART1_Write_Text("And no message could have been any clearer\r\n");       // Send the line via UART
     }
     else if(x==4)// If the button is pressed four times
     {
      UART1_Write_Text("If you wanna make the world a better place\r\n");       // Send the line via UART
     }
     else if(x==5)// If the button is pressed five times
     {
      UART1_Write_Text("Take a look at yourself and then make a change\r\n");   // Send the line via UART
       x=0;                                                                     // Reset the value of x

     }

     while(PINB0_bit == 0);                                                     // While the button is pressed
    }

  }
}
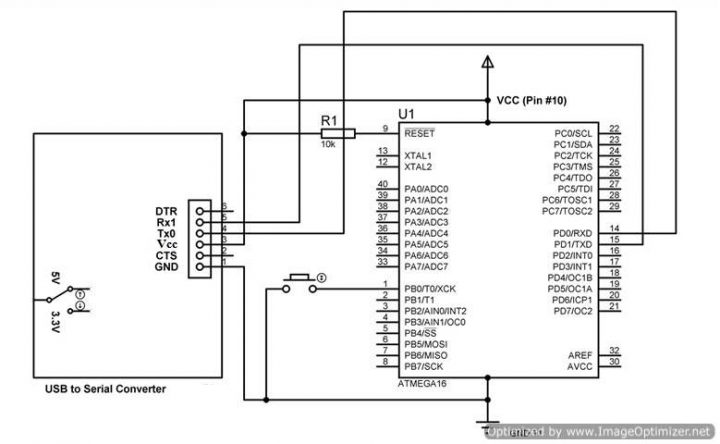
সার্কিটঃ
ব্রেডবোর্ডে মাইক্রোকন্ট্রোলার বসান। নিচের মতো করে সার্কিটে কানেকশন দিন।
| মাইক্রোকন্ট্রোলার | FTDI USB to Serial Converter 3V3-5V (সিলেক্টর সুইচটিকে অবশ্যই 5V পজিশনে রাখতে হবে।) |
| Tx | Rx |
| Rx | Tx |
| VCC | VCC |
| GND | GND |
| VCC এবং RST পিনের মাঝখানে ১০কিলোওহম রেজিস্টর | |
| PA0 পিনে একটি বাটন সুইচ। |
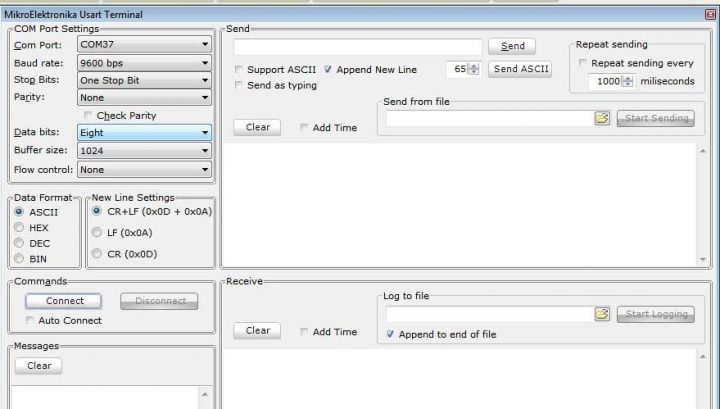
পর্যবেক্ষন প্রক্রিয়াঃ
১)ইউএসবি টু সিরিয়াল কনভার্টারটিকে কম্পিউটারের সাথে কানেক্ট করুন।
২)সিরিয়াল মনিটর ওপেন করুন। এইখানে মাইক্রোসি সফটওয়্যারের মাধ্যমে সিরিয়াল পোর্ট ওপেন করা হয়েছে।
 ৪)মাইক্রোকন্ট্রোলারের সাথে সংযুক্ত বাটনটি চারবার প্রেস করলে চারটি বাক্য সিরিয়াল মনিটরে প্রদর্শিত হবে।
 ]]>
]]>