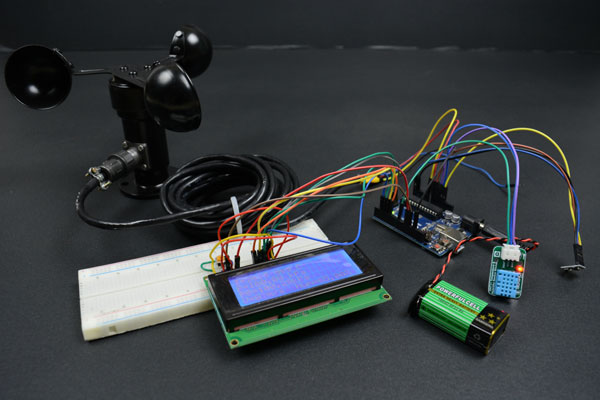
আবহাওয়ার পূর্বাভাস নিয়ে অনেক কৌতুকই প্রচলিত আছে। কথায় আছে, আবহাওয়ার পূর্বাভাসে যদি বলা হয় বৃষ্টি হবে, তাহলে নিঃসঙ্কোচে ছাতা না নিয়ে বেরিয়ে পড়া যায়!আসলেই কি তাই? নিজের একটা ছোটখাটো ওয়েদার স্টেশন থাকলে কেমন হয়? যদি বাসায় বসেই পরিমাপ করা যেত বাতাসের বেগ, তাপমাত্রা, আর্দ্রতা আর বায়ুচাপ?
এই টিউটোরিয়ালে আমরা একটি মিনি ওয়েদার স্টেশন তৈরী করব।

এখানে তাপমাত্রা ও বায়ুর চাপ নির্ণয় করতে ব্যবহার করা হয়েছে Barometric Pressure Sensor BMP-180। বায়ুর চাপের ক্ষেত্রে পরম এবং আপেক্ষিক দুটি মানই নির্ণয় করা হয়েছে কিলো প্যাসকেলে। আর্দ্রতা পরিমাপে ব্যবহার করা হয়েছে DHT11 Temperature & Humidity Sensor Module। আর বাতাসের বেগ নির্ণয় করতে ব্যবহার করা হয়েছে Anemometer Kit (0-5V)।
| প্রয়োজনীয় যন্ত্রপাতি | পরিমান | প্রোডাক্ট লিংক |
| Barometric Pressure Sensor BMP-180 | 1 | এখানে ক্লিক করুন |
| Anemometer Kit (0-5V) | 1 | এখানে ক্লিক করুন |
| DHT11 Temperature & Humidity Sensor Module | 1 | এখানে ক্লিক করুন |
| Arduino Uno R3 | 1 | এখানে ক্লিক করুন |
| LCD 20×4 | 1 | এখানে ক্লিক করুন |
| Male to male jumper | 14 | এখানে ক্লিক করুন |
| Male to Female jumper | 6 | এখানে ক্লিক করুন |
| 1 | এখানে ক্লিক করুন | |
| Breadboard | 1 | এখানে ক্লিক করুন |
| Battery 9V | 1 | এখানে ক্লিক করুন |
| 9V Battery Connector | 1 | এখানে ক্লিক করুন |
| Male connector single row | 16 pins | এখানে ক্লিক করুন |
| Soldering iron | 1 | এখানে ক্লিক করুন |
| Solder lead(Mini) | 1 | এখানে ক্লিক করুন |

| DHT11 Temperature & Humidity Sensor Module | Arduino UNO -R3 |
| Dout | 8 |
| VCC | VCC |
| GND | GND |
Barometric Pressure Sensor BMP-180 এর সাথে প্রদত্ত চার পিনের কানেকটরটি প্রথমে সেন্সরের সাথে সল্ডার করে নিতে হবে। তারপর নিচের কানেকশনগুলো সম্পন্ন করুন।

| Barometric Pressure Sensor BMP-180 | Arduino UNO-R3 |
| Vin | 3.3V |
| GND | GND |
| SCL | A5 |
| SDA | A4 |
এলসিডির সাথে ষোল পিনের মেল কানেকটর সল্ডার করুন। তারপর নিচের কানেকশনটি সম্পন্ন করুন। ছবিটি আরডুইনোর অফিশিয়াল ওয়েবসাইটের সৌজন্যে পাওয়া।

| LCD 20×4 | Arduino UNO- R3 |
| VDD,A, volume pot’s 1st pin | VCC |
| VSS,K, volume pot’s 2nd pin | GND |
| V0 (Volume pot’s 3rd pin) | |
| RS | 12 |
| RW | Gnd |
| E | 11 |
| D4,D5,D6,D7 | 5,4,3,2 |
Anemometer এর তারগুলোর সাথে মেল টু মেল জাম্পার সল্ডার করুন। কারেন্ট আউটপুট পিনটা আমাদের এই এক্সপেরিমেন্টে প্রয়োজন নেই। এর সাথে জাম্পার সলডার না করলেও চলবে।অ্যানেমোমিটার সংক্রান্ত যাবতীয় তথ্য এইখানে পাওয়া যাবে। অতঃপর Anemometer ও আরডুইনোর মধ্যে নিচের কানেকশনগুলো সম্পন্ন করুন।
| Anemometer | Arduino UNO- R3 |
| +(Red) | Vin |
| -(Black) | Gnd |
| Voltage output(Yellow) | A0 |
 এবার ৯ ভোল্ট ব্যাটারি দিয়ে আরডুইনোতে নিচে দেখানো ছবি অনুযায়ী আরডুইনোতে পাওয়ার দিন।
 পুরো সেটআপটি ছিল এরকম।

কোডঃ কোড কম্পাইল করার আগে অবশ্যই DTxx এবং BMP180 breakout arduino library নামক লাইব্রেরিদুটো ইন্সটল করা থাকতে হবে। লাইব্রেরিদুটি ইন্সটল করার পর নিচের কোডটি লিখে কম্পাইল করুন।
/* Mini weather station
*/

// Your sketch must #include this library, and the Wire library.
// (Wire is a standard library included with Arduino.):

#include <SFE_BMP180.h>
#include "DHT.h"
#include <Wire.h>
#include <LiquidCrystal.h>

// You will need to create an SFE_BMP180 object, here called "pressure":

SFE_BMP180 pressure;
const int rs = 12, en = 11, d4 = 5, d5 = 4, d6 = 3, d7 = 2;
LiquidCrystal lcd(rs, en, d4, d5, d6, d7);

#define DHTPIN 8    // what pin we're connected to

#define ALTITUDE 18.0 // Altitude of Karwan bazar in meters
DHT dht(DHTPIN, DHT11);

void setup()
{
  Serial.begin(9600);
  Serial.println("REBOOT");
  lcd.begin(20, 4);


  // Initialize the sensor (it is important to get calibration values stored on the device).

  if (pressure.begin())
    Serial.println("BMP180 init success");
  else
  {
    //  something went wrong, this is usually a connection problem,


    Serial.println("BMP180 init fail\n\n");
    while(1); // Pause forever.
  }
}

void loop()
{
  char status;
  double T,P,p0,a;

  Serial.println();


  status = pressure.startTemperature();
  if (status != 0)
  {
    // Wait for the measurement to complete:
    delay(status);

    // Retrieve the completed temperature measurement:
    // Note that the measurement is stored in the variable T.
    // Function returns 1 if successful, 0 if failure.

    status = pressure.getTemperature(T);
    if (status != 0)
    {
      // Print out the measurement:
      Serial.print("T: ");
      Serial.print(T,2);
      lcd.setCursor(0, 0);
      lcd.print("T=");
      lcd.setCursor(2, 0);
      lcd.print(T,2);
      lcd.setCursor(6, 0);
      lcd.print(" deg C ");
      Serial.print(" deg C, ");


      // Start a pressure measurement:
      // The parameter is the oversampling setting, from 0 to 3 (highest res, longest wait).
      // If request is successful, the number of ms to wait is returned.
      // If request is unsuccessful, 0 is returned.

      status = pressure.startPressure(3);
      if (status != 0)
      {
        // Wait for the measurement to complete:
        delay(status);

        status = pressure.getPressure(P,T);
        if (status != 0)
        {
          // Print out the measurement:

          Serial.print("P: ");
          Serial.print(P/10,2);
          Serial.println(" kPa");
          lcd.setCursor(0, 1);
          lcd.print("P= ");
          lcd.setCursor(2, 1);
          lcd.print(P/10,2);
          lcd.setCursor(9, 1);
          lcd.print("kPa");

          p0 = pressure.sealevel(P,ALTITUDE);
          Serial.print("P(Sea-level): ");
          Serial.print(p0/10,2);
          Serial.println(" kPa");
          lcd.setCursor(0, 2);
          lcd.print("P0= ");
          lcd.setCursor(3, 2);
          lcd.print(p0/10,2);
          lcd.setCursor(9, 2);
          lcd.print("kPa");


        }
        else Serial.println("error retrieving pressure measurement\n");
      }
      else Serial.println("error starting pressure measurement\n");
    }
    else Serial.println("error retrieving temperature measurement\n");
  }
  else Serial.println("error starting temperature measurement\n");

   int sensorValue = analogRead(A0);
   float outvoltage = sensorValue * (5.0 / 1023.0);
   int Level = 6*outvoltage;//The level of wind speed is proportional to the output voltage.
   Serial.print("V= ");
   Serial.print(Level);
   Serial.println(" m/s");
   Serial.println();
   lcd.setCursor(0, 3);
   lcd.print("V= ");
   lcd.setCursor(2, 3);
   lcd.print(Level);
   lcd.setCursor(4,3);
   lcd.print("m/s");
   switch(dht.read())
  {
    case DHT_OK:


      lcd.setCursor(9,3);
      lcd.print("Hum=");
      lcd.print(dht.humidity);
      lcd.print("%");
      break;
    case DHT_ERR_CHECK:

        lcd.clear();
        lcd.setCursor(9,3);
        lcd.print("Error");
        break;
    case DHT_ERR_TIMEOUT:
        lcd.clear();
        lcd.setCursor(9,3);
        lcd.print("Error");
        break;

    }


  delay(5000);  // Pause for 5 seconds.
}
]]>


please give me a step by step video about how to connect the hole system